Thursday, November 24, 2016

AWH Blog Hop: It's beginning to look a lot like Christmas!


Today some of the Art with Heart Stampin’ Up! team girls have created some amazing Christmas projects to inspire you with the theme,
It's beginning to look a lot like Christmas!
 
We have tags, gift bags, teacher gift ideas, decorations and many more fun projects to create this holiday season.

I have been with Stampin' Up! for many years, mainly as a hobby demo, but this year I began holding classes which have become very popular and very enjoyable.  This is the first time I have ever taken part in a blog hop, and as I was rather chuffed to have been invited to join in, I may have overdone it just a little, but hope you will enjoy my Christmas offerings.

It IS beginning to look a lot like Christmas, and as usual, SU have a great range of papers to suit every taste - traditional or modern.   I fell in love with the new Copper Foil and have used it as my main feature, teaming it up with Dapper Denim, Sky Blue and Whisper White.  

So ....... it's time to Deck the Halls ....and how better than with a special banner. 
 

I do love banners!
 

Look how beautifully that copper foil glints.

Banner Details: Cookie Cutter Christmas stamp set; Cookie Cutter Punch;
Candy Cane Lane DSP; Candy Cane Christmas stamp set;
Copper Foil; Dazzling Diamonds Glimmer Paper.
With the halls decked it's time to make the Christmas cards!!!!   I started earlier than usual this year as I held a class in October, and instead of making the same card for everyone, this year there will be lots of different ones to choose from.  I made two each of four different cards to complement my Christmas display.


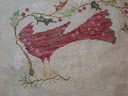
Bird Card Details:  Whisper White card ; Soft Sky card;
Woodland Embossing folder;
Best Birds stamp set; Birds and Blooms thinlets;
Tin of Tags stamp set; Copper embossing powder;
Embellished Ornaments stamp set.  


 Lovely as a Tree Card Details:

Whisper White card; Dapper Denim card; Pretty Paisleys embossing folder;

Lovely as a Tree stamp set; Gorgeous Grunge stamp set;

Embellished Ornaments stamp set; Copper embossing powder.


I couldn't pass on making a card featuring the reindeer, although, unfortunately the tone on tone  stamping doesn't show up very well.  I based this card on one I saw by Jerim Dickins at Willowpiggy blog.
 
Reindeer Card Details: Dapper Denim card; Whisper White card;
Cookie-Cutter Christmas stamp set; Oh, What Fun stamp set.
 

"Lovely as a Tree" stars again in this shaker card.  The Confetti Stars Border Punch was used to cut the little copper stars.  Just love this card, because if you look closely you will see my reflection in the window.

While we may not be in the habit of roasting chestnuts in Australia, we most certainly have many traditional Christmas foods and many of us will be giving gifts of our own traditional home baked cakes and goodies or chocolates or chocolates and ... well, you get the idea, so it's time to get those gift boxes made ......


Front of Baker's Box


Back of the box showing the handles.


...... this one is die cut from Whisper White Thick card with Dapper Denim and Copper trimmings and is made with the Baker's Box Thinlets.  It's a great size for medium sized cupcakes, chocolates or any other gift.

This next lovely box is from a tutorial by Helen Griffin in the UK .  It is really gorgeous and was fun to make.  Filled with Ferrero Rocher chocolates it will make a sweet gift.


Box Details: Dapper Denim card; Floral Boutique dsp; Thoughtful Banners stamp set; Duet Banner Punch.

Sometimes you just need a teeny tiny treat that can be quickly whipped up for all the members of groups you belong to or for your children's classmates and there are many clever novelties to be made.

These tiny little mugs only hold one Ferrero Rocher chocolate, but they are super cute.


I saw these online - made by Brigette Keiling from Stempel-fantasie, who made them as her On Stage gifts.

The idea for these clever little trees comes from Brenda Quintana (Qbees Quest), and hold nine Hershey's Kisses.  


So with all our gifts made, we are going to need some tags, and there's sure to be someone who would love their own box of gift tags as an early present.  So many of my friends gift their own baking at Christmas, so they will be receiving a box of these food themed tags. So many yummy stamp sets to help us create, because "It's the most decadent time of the year"!  This simple little box holds 15 tags including embellishments and layers.
 

Gift Tag Details: Whisper White card: Dapper Denim card; Soft Sky card;
Scalloped Tag Topper Punch; Yummy Little Christmas stamp set;
Candy Cane Christmas stamp set; Oh, What Fun stamp set; Tin of Tags stamp set.


We probably need to make some gift card holders for those difficult delightful people for whom you just cannot get it right.
 

This one is only small so it could fit inside a Christmas card, but it is elegant enough with it's belly band and copper embellishment, to give on it's own with your choice of gift card tucked inside.  It's also economical as you can get 3 from an A4 piece of card.


Gift Card Holder details:
Dapper Denim card;
Cable embossing folder;
Delicate Ornament Thinlets;
Copper Foil; Candy Cane Lane dsp.


So that only leaves the presents to be wrapped.  For many of us that is a job tackled on Christmas Eve right after the shops have finally shut!!  ... and if you've forgotten to buy the wrapping paper, then you can quickly make your own by stamping on the brown paper that SU use as a filler in their delivery boxes ...
 

 ...... or not ??? 

My photography skills are limited, so my Darling Daughter came to the rescue and conducted an amazing photo shoot.  She brought with her some great props and we had loads of fun while she snapped away.  I am delighted with the results and hope you enjoyed her photos too.

If you're still with me, then you deserve a great Christmas with beautifully crafted gifts under your tree.

May your Christmas be filled with family, friends, food and fun, and may the year ahead be a healthy and happy one with time to enjoy the things you love.

Mary

It's time to hop across to Monika O'Neill's blog. 
http://www.monstampingcorner.com/2016/11/awh-its-beginning-to-look-lot-like.html
If you find a broken link or have come to this blog hop from a different entry point, you can view the participants below:
  1. Rebecca Jacovou
  2. Ros Davidson
  3. Kathryn Ruddick
  4. Kate Morgan
  5. Rachel Palmieri
  6. Claire Daly
  7. Mary Kelly
  8. Monika O'Neill
  9. Tina Gillespie
  10. Kathryn Mangelsdorf
  11. Catherine Proctor
  12. Judy May

Tuesday, November 15, 2016

Merry Christmouse for JAI

Just Add Ink have a colour challenge for us this week.  Not the colours I would normally reach for, and certainly not your usual Christmas colours, but as the Merry Mice set was right in front of me that is the one I went with.  I have tried something a little different. 

I knew what I wanted to do - strip of dsp down one side; partial cutout of the mouse; and very clean and simple!!  Right!  - after an hour of searching I finally found some stripes in the Floral Boutique pack and went with that. 


I found this one harder to photograph than usual.  I seem to have shadows everywhere today. 
Cheers,

Sunday, October 16, 2016

Flutter by butterfly ....

flutter by butterfly, 
floating flower in the sky, 
kiss me with your petal wings, 
whisper secrets, tell of Spring.

My Daughter's friend was celebrating a special "0" birthday last night.  The colour scheme for the party was purple, mint and white, and as she just loves butterflies it was pretty obvious that she would get a kaleidoscope of them.  

My go to card for special birthdays is the 'card in a box' as it is so easy to get the wow factor with them.   Yes, they do take a lot more time, but I think they are worth it.

So this was the card for my Daughter to give:

 
 and this was my card to her:
 

and how about this gorgeous cake, made by my Daughter?  The colour of the "nude" icing was just perfect.


Once cut, the cake showed the marbling of the colours beautifully.  


A very special cake for a very special lady.
 
 
Many happy returns!!

Saturday, October 8, 2016

JAI #332 Colour Challenge

It's been a long time since I joined a challenge at Just Add Ink.

I recently spent time in Queensland "dog sitting" and took along some stamped images to colour and the tools to do some ink blending.  Once home again those pieces sat on top of the basket of "works in progress".   Although not intentional, (mainly due to my limited supplies), one of the images co-ordinated with one of the ink blended backgrounds, and as both pieces fit the criteria for this week's challenge, I combined them for this card. 


Although I am a SU girl, this time my floral image is a new purchase from Altenew and after much indecision I just had to use this older sentiment from PTI.

This card has a little of everything - stamping, colouring, water colouring, ink blending and fussy cutting.

Cheers,
Mary

Thursday, September 29, 2016

Flower Box Class

Yesterday four of my class ladies came to learn how to make a "card in a box".  
 
I have made many different versions over the last few years and knew that they were quite time consuming, but hadn't realised just how much time they took.  So glad I pre-cut and scored all the basic box elements, cut the leaves and the pieces of window sheet to mount the flowers on.  We started at 1pm and finished around 6.30pm with a well earned stop for scones and lemon curd sponge somewhere in there as well.
 
In retrospect it would have been a little easier if they had all made the same colours and flower style, but, hey, they had fun choosing their colours and design as they each knew who they were making their box for.
 
Unfortunately, with finishing so late, I totally forgot to take some photos of the finished boxes. 
 
One lady chose to make the spiral roses in yellow and cream and two made their flowers from the Flower Shop set - one in multi colours and one in blue - and the other lady decided on a balloon theme in Dapper Denim.  Two of these ladies are complete beginners and other two are fairly new to stamping, so this was quite a project for them, but they all loved it.
 
As I am unable to show yesterday's creations I have added some photos of ones I have done previously.

This is the style using the spiral rose die:

 
Flower Shop in multi colours:
 
and an all blue one:


a couple of special "big" birthday balloon boxes:


and a fun one for my Grandson!!


Thanks for popping in, I hope you enjoyed hearing about my fun day yesterday.  It really is lovely being able to share something you enjoy with others.  I know I should have started these classes sooner.
Mary

Friday, September 16, 2016

For the girls

Today I wanted to post a few of the different cards made recently.

The first one was was my Daugter's oldest Niece.  Hard to believe where the time has gone.  It seems such a short time since they were babies.

Happy Birthday Caitlyn!

Now, whatever happened to our sweet princesses and ballerinas?

It seems incredible that beautiful young 11 year old girls would want a birthday party theme of "ghouls", but that was exactly what my Granddaugter's friend wanted.  

The party venue was completely stage dressed and quite amazing, as were the outfits the attendees arrived in.   Thankfully, the card I came up with reflected the theme as well.  I was so relieved when I    found this stamp in my stash.  It is "Elizabeth" from "Make it Crafty" and was perfect for the occasion with the addition of a bit more mascara.  Going by some of the outfits at the party, I probably should have had her in a white dress with blood dripping down it from her eyes !!!!!!  EEEEEEEEK!!!!!!!!


This third one was for a 12 year old and had a lot more opportunity for some sparkle.

Happy stamping,
Mary

Card classes

I am now holding monthly card making afternoons for a few neighbours and it has been such a lot of fun.  Can't imagine why I didn't do it sooner.
As they were pretty much beginners, I tried to start out fairly basic with the card designs, but I also wanted them to see the fun stuff as well.
These are just two of the cards we have made so far.


A very simple card with a little stamping on the background and three layers for the butterfly, while this one gave them a chance to play with the big shot and an embossing folder.


Looking forward to the next gathering,
Mary 


Thursday, September 1, 2016

Snap - you're great!


It's always harder to think of something appropriate for a male birthday.  However, as soon as I saw the camera in the "Pun Intended" stamp set, I knew who I would be using it for.  It took a little longer to work out how to use it, but since I had been trying my hand at ink blending, I decided to go for a sunset background..

I was able to use another of the sentiments from the set on the inside of the card - Hope your Birthday is "picture perfect" !


I resisted the No Bones Stamp set for quite some time, but finally gave in, and I am so glad I did.  There have been some very clever cards made with it.  Some of them add sentiments like "old fossil" and "bag of bones", but you'd have to be on good terms with the recipient to get away with those.  
I went with the safer option on this card which was cased from Bibi Cameron. (sorry I am unable to link at the present).

Wednesday, August 31, 2016

Jean 102

Happy Birthday Jean! 


My friend's Mother has celebrated her 102nd birthday.  
Jean is an amazing lady who still keeps up to date watching the news on TV, and just loves watching the cricket!

Wishing you many more "happy" birthdays, Jean.

Sunday, March 13, 2016

Think watercolour

Blackberry Bliss, Rich Razzleberry and Tip Top Taupe.  Sound delicious?  They sure are!
Don't take my word for it - pop over to Just Add Ink where they are flying these colours as their challenge. The design team have outdone themselves this week and every card is a real delight.

I have been trying lots of different techniques lately, including watercolouring, and these colours were such fun to use.

 
The flower and sentiment are from SU "Best Thoughts" stamp set - a really lovely set with two sentiments and a butterfly as well. 
 
I used watercolour paper for the background and just played.  In my first attempt I was rather heavy handed with the inks, but I made the flowers deeper too and really liked it, but that card has already been delivered.  I used more water this time and kept the colours paler.    Such fun working out how to make splotches and blobs.  The flowers were done much the same and then I just added a bit more colour where needed.  
 
I have never had much success with the white gel pen, but I recently found a Gelly Roll pen in my stash and I found it gave me a better result.  I gave the flowers a quick lick with the Wink of Stella and called it done.
 
Hope you like it.
Mary

Tuesday, January 19, 2016

Just Add a new plane

At Just Add Ink the first challenge for the year is to use something new. 
 
There are plenty of new Stampin' Up products - many of which are free during Saleabration, and my first choice was a stamp set called "Sky is the Limit" because I always need lots of cards for the guys in January.  I have already made 8 cards with this set - it is definitely a keeper.
 
This first card was for a neighbour who (obviously) is celebrating his 94th birthday, so I got to use all of the sentiments on his card.


and this is the inside:


I tried using some retired dsp for the next two cards:


 and then used the retired Cloud embossing folder on this one.

and the inside:

That should do it for male cards for now,
Cheers
Mary